Tag Archives: holiday

Coconut Pumpkin Pie with an Almond Crust

I better get a move on with all these recipes. Christmas is almost here and I’m still trying to catch upon everything from Thanksgiving! So I’ll keep this post short and sweet.

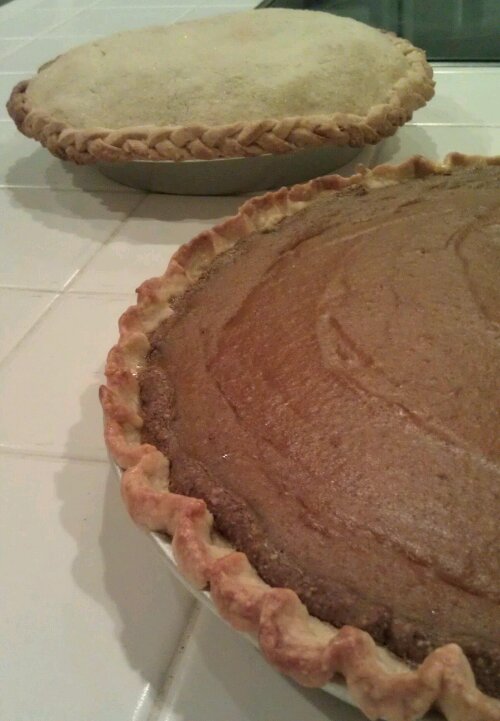
What: Coconut Pumpkin Pie with an Almond Crust

Where: From 101 Cookbooks

Why it’s special: The filling is made with coconut milk and the edge is lined with roasted almond paste. (The paste SHOULD have been a spread for the crust, but I forgot and only remembered last minute to use it.)

Coconut Pumpkin Pie (recipe adapted from 101 Cookbooks and Butter)

INGREDIENTS

Crust (Makes enough for 2)

3 cups plain flour
1/2 cup super fine sugar
1 1/4 cups (1 1/2 sticks) unsalted butter, cold and cubed
2 egg yolks
4 tbsp cold water
1 tsp vanilla extract

Filling

2 cups hazelnuts (divided) , toasted (I used almonds.)
1/2 cup brown sugar
1 tablespoon pumpkin pie spic
1 teaspoon salt
1 tablespoon arrowroot (or cornstarch)
1 1/2 cups unsweetened pumpkin puree
1 teaspoon vanilla extract
3 extra large eggs PLUS one for glaze, lightly beaten
1 cup coconut milk

METHOD

For the crust

  1. Put the flour, sugar and butter into a food processor or stand mixer. Mix on a low speed until mixture resembles very coarse breadcrumbs.
  2. Add the egg yolks, cold water and vanilla, and process until a dough forms.
  3. Form two disc from the  dough and wrap each separately in plastic wrap. Refrigerate for at least an hour.

For the nut paste

  1. Puree 1 1/2 cups of the toasted hazelnuts in a food processor until they turn into a hazelnut paste, past the ‘crumble’ stage. Set aside.
  2. Chop the remaining 1/2 cup of hazelnuts and set aside separately, these will be sprinkled on top after the pie is baked. (I forgot this entire part and only as an afterthought did I use the paste to line the edge of the pie. Spread on the crust would have been better.)

For the filling

  1. To make the pumpkin pie filling, whisk together the brown sugar, pumpkin pie spice blend, salt and arrowroot. Stir in the pumpkin puree, and vanilla. Now stir in the eggs and coconut milk until just combined. Set aside.

Assembly

  1. Preheat the oven to 350 F. When you are ready to make your pie, remove one of the discs of pastry from the fridge. (The other you can save for your next pie.)
  2. On a lightly floured surface, or between two sheets of baking paper, roll out the dough until it is big enough to line your pie dish.
  3. Lightly flour the dough and gently roll it up onto your rolling pin. Then unroll it into your pie dish, easing it in and pressing it into any edges. Trim the excess pastry, leaving a 2cm (1 inch) overhang.
  4. Before filling the pie crust, crumble the hazelnut paste on top of the pie dough into the pie plate, quickly and gently press it into a thin layer across the bottom creating a layer of hazelnuts that will sit between the dough and the filling. Using the last egg gently brush the decorative edges of the pie dough. Use a fork to prick the pie dough a few times to prevent air bubbles.
  5. Fill the pie crust with the filling and bake for about 50 minutes – the center of the pie should just barely jiggle when you move the pie – the edges should be set.
  6. Let the pie cool a bit, this makes slicing less messy. Serve straight or with a dollop of bourbon-spiked, sweetened whipped cream or creme fraiche and a sprinkling of chopped hazelnuts.

Someone's excited for pie!


Classic Apple Pie with a Braided Crust

There are no surprises when it comes to apple pie, which is probably one of the reasons it’s such a classic and beloved dessert. Flaky crust; sweet and tart filling–a good one will soothe and fill every heart, soul and tummy with content!

That said, this pie did surprise me: First, by it’s interesting cook-before-you-bake filling and second, by its overwhelming popularity. It was more popular than the coconut pumpkin (recipe to come soon) AND I was asked to make a second, larger one just two days later!

It’s basically one recipe I used here, from Butter. The filling requires stewing before baking, which was a new concept to me. I was worried that the apples would end up a smushy mess, but they didn’t. They totally held they’re shape. The cooking softened the tartness and allowed the juices and spice to really marry and develop. As for the crust, it’s basic and really good–flaky, buttery, light. As with any crust, just be careful not to over work it when you roll it out–it’ll be hard and heavy if you do. The cool shaping into braids idea came from Food For My Family. I saw her photo on Tastespotting and decided to try to recreate it the effect. It turned out to be super simple and so very delicate and pretty!

I love this pie: yummy filling, lovely crust. The first one was great and the second was even better! I threw a handful of raisins in with the apples. They added a nice juicy pop, I thought. Also, I was able to serve the pie still warm and it was awesome. I’d definitely suggest serving it warm if you can.

Enjoy!

Classic Apple Pie (recipe courtesy of Butter and Food For My Family)

Serves 8-10.

INGREDIENTS

Crust

3 cups plain flour
1/2 cup super fine sugar
250g (1 1/4 cups) unsalted butter, cold and cubed
2 egg yolks
4 tbsp cold water
1 tsp vanilla extract

Apple Filling

8 large Granny Smith apples
1/4 cup sugar
1 tsp cinnamon
2 tbsp water
1 tbsp cornflour

METHOD

For the crust

  1. Put the flour, sugar and butter into a food processor or stand mixer. Mix on a low speed until mixture resembles very coarse breadcrumbs.
  2. Add the egg yolks, cold water and vanilla, and process until a dough forms.
  3. Take a third of the dough, shape it into a disc and wrap in plastic wrap. This will be your lattice. Form a disc with the remaining dough and wrap it in plastic wrap. This will be your crust. Refrigerate for at least an hour.

For the filling

  1. Peel, core and chop the apples into 2cm (1 inch) cubes.
  2. Combine the apples, sugar, cinnamon and water in a saucepan. Cook, over a low heat for 20 – 25 minutes, stirring occasionally. The apples should be soft but still hold their shape.
  3. Drain the juice from the apples into a small bowl. Stir in the cornflour until it dissolves and return this mixture to the apples. Mix to combine. Set aside.

Assembly

  1. When you are ready to make your pie, remove the larger disc of pastry from the fridge. Preheat the oven to 365 F and grease a pie dish well.
  2. On a lightly floured surface, or between two sheets of baking paper, roll out the dough until it is big enough to line your pie dish.
  3. Lightly flour the dough and gently roll it up onto your rolling pin. Then unroll it into your pie dish, easing it in and pressing it into any edges. Trim the excess pastry, leaving a 2cm (1 inch) overhang.
  4. Fill the pastry shell with the apple filling.
  5. Remove the smaller disc of dough from the fridge. On a lightly floured surface or between two sheets of baking paper, roll out the dough until it is big enough to cover your pie dish. Trim the extra dough so that you create an even lip that just reaches the edge of the dish.
  6. Roll out the excess dough and cut into thin, long strips. Then braid and line the edge of the pie. Press gently to seal.
  7. Brush the entire pie with water or egg wash. Sprinkle with a little sugar.
  8. Bake for 40 minutes to an hour, until the crust is golden brown.

Pretty braided crust

Another Portland Thanksgiving

image

image

I’m home again. I baked, I ate, I traditioned. After all that, I’m ready for sleep.

I’ll write about the pies tomorrow.

Ciao ciao and happy thanksgiving

Theresa

Flan Napolitano de Queso (Caramel Cheesecake Flan)

I’m loving all things flan, pudding and custard lately. Originally I had planned on making an egggnog flan for our Christmas dinner, but then I found this recipe for a caramel cream cheese flan on Morsel & Musings and just had to make it.

Flan-making is pretty standard: prepare caramel, mix liquids, steam-bake and chill for a few hours/overnight. Variation comes in the form of all the different milks, creams and extracts you put in. For Thanksgiving, I used coconut milk, condensed milk and coconut flakes, which yielded a smooth, lighter pudding. This time I used cream cheese, condensed milk and evaporated milk, which resulted in a denser, creamier and tangier flan. Other possible variations could be to use eggnog, pumpkin, soft cheeses, (mascarpone or ricotta perhaps), yogurt or quark, chocolate, or different extracts (vanilla bean, almond, hazelnut, rosewater, pistachio, etc.)

Rich, decadent and silky smooth is how I would describe this flan.

And it tastes just as good as it looks!

Enjoy!

Flan Napolitano de Queso (Caramel Cheesecake Flan)

recipe slightly adapted from Morsel & Musings

printable recipe

INGREDIENTS

6 eggs

1 can evaporated milk

1 can sweetened condensed milk

250ml (1 cup) milk

250g cream cheese

1 teaspoon vanilla essence

3/4 cup sugar

METHOD

  1. Preheat oven to 355 F/180 C.
  2. Carefully melt the sugar in a saucepan and allow to brown gently to form a caramel. Pour into a cake tin or flan mold. (I used a 8″ x 8″ x 1-1/2″ square pan).
  3. Mix all of the other ingredients together in a blender.
  4. Add the blended ingredients into the tin on top of the caramel, then cover tightly with aluminum foil. (Oops, forgot to do this. Luckily no harm done.)
  5. Place inside a bain-marie in the oven for approximately 50 minutes or when an inserted knife or skewer comes out clean.
  6. Leave to set in the refrigerator for at least 2 hours or overnight.
  7. When cooled, turn upside down and serve.

Home for Christmas

It’s only been a month since I was last in Portland. Oh, but there’s no place like home, especially during the holidays.

This Christmas was quiet. My brother is still far away in Laos, investigating his positionality and at the same time charming people, meeting monks and wondering why the burden on his shoulders keeps getting heavier. So it was just the four of us, plus a family friend and the exchange student from China, this year. There was no turkey, much to the disappointment of my sister, and as my dad said, “we’re not ham people”. Instead, there was Japanese Butter Yaki Salmon, Peruvian Papas a la Huancaina, Japanese Chirashi Zushi, Japanese Sesame Spinach (horensou gomae), Green Bean Casserole (my sister insisted) and salad, of course. For dessert, there was a Pear Custard Pie, Bread Pudding and Flan Napoletano de Queso. Not very traditional, but a feast just the same.

I’ll be posting recipes and pictures in the days to come. Btw, I do realize that the huancaina sauce is the wrong color. It should be bright yellow, but as I can only get dried Peruvian yellow chiles in Portland, it came out burnt orange instead. The dried chiles also altered the flavor a bit, though overall still pretty good.

To all my loved ones and dear readers, I wish you all happy holidays and a peaceful new year.

Theresa  (^_^)

Flan de Coco (Coconut Flan)

Christmas is only 9 days away and I’m still posting about Thanksgiving! So, no time for witty anecdotes–just a recipe for this unbelievable coconut flan, my new favorite dessert. Flan is so versatile! I’m making an eggnog version for Christmas!

By the way, for the perfect caramel, I referred to David Lebovitz’ post “Making the Perfect Caramel” found here.

Enjoy!

Flan de Coco (adapted from Laylita’s Recipes)

printable recipe

INGREDIENTS

1 cup sugar

6 eggs

1 can of coconut milk

1 cup grated coconut (I used dried unsweetened, but perhaps fresh would have been better)

3/4 cup sugar

1 can of evaporated milk

3 tbsp corn starch

Pinch of salt

METHOD

  1. Start with an even layer of sugar in a saucepan over medium high heat to make caramel. Bring to a boil, dragging the sugar at the edges inward as it browns. Cook until the caramel starts to turn a light brown honey color, but be careful as it can burn very quickly.
  2. Pour caramel into ramekins or flan mold and distribute evenly. (I used a square 8 x 8 x 1.5 inch baking pan.)
  3. Pre-heat oven to 350 F. Place water in a large baking pan, the water should fill up to no more than 1/2 of the height of the ramekins or baking pan.
  4. Using an electric mixer, mix eggs, coconut milk, grated coconut, sugar, evaporated milk, corn starch and pinch of salt together until all the ingredients are well blended.
  5. Add the flan mixture to ramekins or baking pan.
  6. Place the ramekins or baking pan into the prepared pan with water and bake for 40-50 minutes. Allow to cool completely, remove from the molds or baking pan and serve. (I refrigerated mine overnight, so that the caramel could completely liquify and become nice and syrupy!)

Mushroom and Roasted Eggplant Moussaka

This moussaka was my veggie main for Thanksgiving. I made it for my mom (who’s actually pescatarian) and my friend S. who joined us for dinner. She brought along her amazingly talented chef husband and also her little sweet pea, baby V. (We all took turns staring at and holding him. He in turn entertained himself by staring at the kitchen light and spitting up on me.) Anyway, moussaka is perhaps a bit unconventional for the holidays, but we are an unconventional family. Besides, who cares about tradition—this is awesome.

Recipes involving both cooking and baking are often labeled “laborious” and “time-consuming”. I don’t think so; actually, I think those kinds of dishes are total time-savers, especially on days when you know the oven is going to be occupied most of the time by a big, fat turkey. (I had to negotiate with my dad for oven time. He takes his turkey verrrry seriously.) They also have more complex flavors because of the multi-stage prep and cooking time. I roasted the eggplant the night before, made both red and white sauces and assembled the gratin in the morning, and then didn’t think about it again until the turkey came out hours later, at which point I shoved it in the oven and baked it for an hour. See, not complicated; just requires a little organization!

Time-consuming or not, it was delicious. CookThink says the mushrooms “are so rich and meaty” that you won’t miss the meat, and it’s true! I’m sure my mom and S. didn’t miss anything; and I don’t think the rest of us did either. The superstar of the mushroom sauce, though, was really the spice combination of cinnamon, allspice and oregano. Aromatic and bold, they are what truly make the sauce. As for the eggplant, I saw a few versions, in which it is breaded and pan-fried, like in eggplant parmigiana, but I liked them roasted. Maybe I’ll try it that way next time when there’s less competition, i.e. no turkey. One more thing to note is that unlike with lasagna, the bechamel sauce goes on top of the layered veggies. It’s flavor—nutty from the nutmeg and salty from the parmesan—is just as important as the vegetables in bringing the dish together.

This was fun! Too bad I forgot to take photos…guess I was too busy eating. 😛

Enjoy!

Mushroom and Roasted Eggplant Moussaka (recipe adapted from Janet is Hungry and  CookThink)

printable recipe

Serves 6-8

INGREDIENTS

Mushroom Sauce

1/4 cup olive oil

2 medium eggplants, cut into 1/4″ thick slices

3 cloves garlic, chopped

1 large onion, chopped

1 lb button mushrooms, sliced

2 large tomatoes

1/4 cup dry white wine

1/2 tsp ground cinnamon, or more if necessary

1/2 tsp ground allspice, or more if necessary

1/2 tsp oregano, or more if necessary

1/2 cup chopped parsley

2 tbsp tomato paste

salt and pepper to taste

Bechamel Sauce

4 tbsp unsalted butter

1/2 cup flour

2 1/2 cups milk (I used 1%, but any will do, even skim)

1/2-3/4 cup grated parmesan

salt and pepper to taste

Topping

3/4 cup bread crumbs (I made my own with 2 slices of my half-white bread)

METHOD

Mushroom Sauce

  1. Preheat the oven to 350 F. Grease 2 baking sheets with the olive oil, and arrange the eggplant slices on top in a single layer. Douse and season each side with the olive oil, salt and pepper. Bake, turning once, 20 minutes. (I did 20 minutes on each side; I wanted them really roasted. And then I wrapped them in foil to continue steaming until cooled.)
  2. Plunge tomatoes in boiling water for 30 seconds, then refresh in cold water. Peel and chop roughly.
  3. Heat some olive oil over medium-high heat and add onions, garlic and mushrooms. Cook until mushrooms are soft, 15-20 minutes.
  4. Add tomatoes, cinnamon, allspice, tomato paste, parsley, wine, salt and pepper to the mushroom mixture. Bring to a boil, reduce heat, and then cover and simmer or 15-30 minutes, or until it tastes right.

Bechamel Sauce

  1. While the red sauce is simmering, prepare the bechamel. Melt butter in a large saucepan. Stir in flour and cook for 30 seconds. Remove from heat and slowly stir in milk. Return to heat and whisk until sauce thickens. Stir in nutmeg and Parmesan. Again, remove from heat and set aside.

Assembly

  1. Spoon alternating layers into a greased 9″x13″ baking dish. Start with a layer of eggplant, then half the mushroom mixture. Then another layer of eggplant, and the second half of the mushroom mixture. Finish with a layer of eggplant.
  2. Spread sauce over last layer of eggplant and sprinkle with breadcrumbs. Bake at 350 F covered with an aluminum foil tent for 45 minutes, then remove the foil and bake an additional 15 minutes until golden. Let sit 5-10 minutes before serving.

Peruvian Potato and Tuna Salad Rolls (Rollos de Causa Rellenos con Atún)

Causa is Peru’s version of potato salad and it’s also one of my favorites. It seems unfair to compare it to the yellow, mayo-laden, eggy stuff we have here in the US. Causa is actually more like a cold gratin with layers of creamy pureed potatoes, tuna (or chicken or crab), avocado and a garnish of tart olives and hard-boiled eggs.

The recipe I found in a newspaper article from The Olympian is excellent and seems pretty close to authentic (at least to me). Especially helpful is the explanation on how to make aji amarillo (yellow Peruvian chile) paste with dried chilies. You can find a lot of “exotic” ingredients in Portland, but it’s still rather limited compared to the selection available in bigger cities. Here in San Francisco, I can buy frozen aji amarillos, but in Portland, I only found dried, which are available at Whole Foods. In any case, the recipe lists the chilies as optional, but I wouldn’t dream of leaving them out; they’re used a lot in Peruvian cooking and also provide a very particular spice, color and heat to the food.

In making this, I should have paid better attention to the ingredients list. First, I didn’t use Yukon gold potatoes, which are a must because of the characteristic yellow color and texture they give. I used regular baking potatoes, which I found too starchy and also a lot less pretty. Also, I forgot to garnish the top with olives and boil eggs; instead I used only chopped parsley.  Another thing I did differently, on purpose, is that I didn’t make mine in gratin form, but rather made mine maki-sushi style, i.e. rolled. I’ve seen it served both ways and since there was already so much food, I think the smaller pieces fit better.

I’ll definitely be making Causa again—it’s simple, comfort kind of food, which I love, but can be dressed up to be super elegant too.

Enjoy!

Rollos de Causa Rellenos con Atún (adapted from an article found in The Olympian)

printable recipe

INGREDIENTS

Potato Paste

1 1/2 lbs Yukon gold potatoes (ca. 8-10), washed and scrubbed, but not peeled

1/4 cup vegetable oil

1/4 cup lime juice, or more if necessary

1 tbsp aji amarillo paste, optional

salt to taste

Filling

2 cans tuna, drained (I used white tuna in water)

1/2 cup mayonnaise

1 tbsp chives, finely chopped

1 tbsp parsley, finely chopped

1 tbsp red bell pepper, finely chopped (optional)

1/4 cup frozen corn, peas and carrots mix, thawed and drained

salt and pepper to taste

2 medium avocados, peeled and sliced thinly lengthwise

Garnish

3 hard boiled eggs, cut into wedges or sliced into rounds

6 kalamata olives

METHOD

For the Potato Paste

  1. Cook potatoes until tender. Peel when still warm, then put through a ricer. Mix riced potatoes with oil, salt and aji amarillo. Add lime juice and stir the mix until the dough is soft and well blended. Refrigerate at least 1 hour.

For the Filling

  1. Add mayonnaise, thawed vegetables, chives, cilantro, salt and pepper. Mix well and add salt if necessary.

For Assembly

  1. Maki-sushi style: Line a bamboo maki mat with plastic wrap. Spread a portion of the potato paste to the edges of the mat.
  2. Then, spread filling over the potato paste, leaving 1/4 inch space at each edge. Distribute evenly 1/4 of the avocado slices on top.
  3. Roll, pulling out the plastic as you go and wrapping it around the roll to finish. Repeat for remaining paste and filling. Place wrapped rolls on a platter and refrigerate. When ready to serve, unwrap and place back on platter. Slice into 1 1/2 inch pieces, sprinkle chopped parsley on top and serve.
  4. Traditional Squares: use a square baking pan, lightly oiled. Spread half of the potato paste in it, then spread the chicken filling. On top of the chicken filling spread the other half of the potato paste. Cover the baking pan and keep in the refrigerator until serving. Causa is a cold dish. When ready to serve, cut the causa into squares. With the help of a spatula, transfer each piece to a salad plate. Once on the plate, use the slices of avocado, egg and olives to decorate each piece. Each piece should have an olive and the same number of egg wedges and slices of avocado. (I didn’t add the olives or eggs; just topped mine with more chopped parsley)

Hint: You can make your own aji amarillo (yellow Peruvian chile pepper) paste with one pound of fresh aji amarillo and 2 tablespoons of vegetable oil. Place aji in a saucepan with water and boil for 5 minutes. Change the water and repeat procedure twice. Cut, seed and devein ajies. You can peel some ajies to reduce spiciness. Blend with oil until you get a creamy paste.

As an alternative to fresh aji amarillo, you can use dried chilli-peppers (known as dried aji mirasol), which are easier to find outside of Peru. The procedure is similar to the fresh ajíes, just add some water when blending until you get the creamy paste.

Yummy, Yummy Sweet Potato Coconut Bread

I avoided zucchini breads for a long time, kind of grossed out by the idea of a sweet vegetarian meatloaf. But I was so, so wrong.  Veggie desserts are actually weirdly wonderful things, especially those with sweet potatoes in them.

So I recently signed up for an every-other-week CSA service with my brother. And so far, each time I’ve gotten sweet potatoes, which I haven’t known what to do with. Until now. I’m reminded of the saying, “when life gives you lemons…”; but in my case, when CSA gives you too many sweet potatoes, make sweet potato bread!

In this quickbread recipe (courtesy of Joy the Baker), sweet potato and zucchini are combined with hardy whole wheat, buttery coconut and spicy cinnamon-nutmeg. I love both veggies in sautés, in salads, gratins and sandwiches. But in this bread, humble veggies are transformed into a sweet and dense cake loaf that really is sugar and spice and eeeeeverything nice.

I couldn’t really taste the zucchini, though I like the green speckles it adds. The sweet potato and coconut are the dominating flavors. Also, the addition of whole wheat and applesauce make it feel almost healthy.

Enjoy!

Sweet Potato Coconut Bread (recipe adapted from Joy the Baker)

Makes one 9x5x3-inch loaf

INGREDIENTS

1 cup all-purpose flour

1/2 cup whole wheat flour

1/2 cup sweetened coconut flakes (the small, non-sticky kind)

2 teaspoons cinnamon

1 teaspoon freshly grated nutmeg

1 teaspoon baking soda

1/4 teaspoon baking powder

1/4 teaspoon salt

1 cup granulated sugar

1 cup brown sugar, packed

1/2 cup vegetable oil

1/4 cup apple sauce

3 eggs, at room temperature

1 teaspoon vanilla extract

1 cup grated zucchini

2 cups peeled and grated sweet potato

1 cup chopped walnuts (I used almond flakes)

1/2 cup dried cranberries or raisins (optional)

METHOD

  1. Preheat oven to 350 degrees F (177 degrees C).  Butter and flour a 9×5×3-inch loaf pan and set aside.
  2. In a medium mixing bowl, combine the flours, coconut, nutmeg, cinnamon, baking soda, baking powder and salt. Mix well.
  3. In another large mixing bowl, beat the sugar, oil, eggs and vanilla extract.  Mix in the grated zucchini and sweet potato.  Add the dry ingredients to the bowl and stir just to combine.  Fold in the nuts and dried fruit; stir well.
  4. Transfer batter to prepared loaf pan.  Bake until wooden pick inserted in center comes out clean, about 1 hour and 20 minutes (Mine was done after 1 hr 10 min).
  5. Cool bread in pan on a rack for 15 minutes.  Then using a butter knife, loosen the edges of the bread and turn out onto a rack to cool completely.  Can be prepared 1 day in advance.  Wrap in foil and keep at room temperature.

Liso’s French B-day Brownies

A little birthday treat for my littlest Liso who celebrated her big 28 last Friday.

I needed something that was compact and easy to transport—and something that would not make me look totally ridiculous waiting in line at the club (so much for that one—one club manager thought I brought my make-up kit). Brownies seemed like the wisest choice, yet again.

I could never get sick of brownies (baking or eating), but they are far from what I would call pretty. They’re  frumpy, brown squares—not exactly delicate or eye-catching. So how do you turn something ho-hum into something ta-dah?

You call them French (or at least, according to Dorie Greenspan, French-inspired) and all of a sudden you’ve upped the ooh la la quotient in a major way. That’s exactly what Dorie did in her recipe for French Chocolate Brownies (not sure why she thought it necessary to include “chocolate” in the title).

The base recipe is basic; same story with the method. And the resulting texture is good: crackly top and smooth and creamy middle. What makes these different is  Greenspan’s addition of rum, raisins and a dash of cinnamon to the batter, nothing fancy by any means, but oh, what a difference they make.  You’ll love these for the same reason you love rum-raisin ice cream—for that warm all over and ever so slightly naughty sensation you get when you eat them. (^o^”)

By the way, I substituted vanilla extract for the rum—I didn’ t have any at home, and vanilla was the closest thing I could find that has a similar alcohol flavor.

Dorie Greenspan’s French Chocolate Brownies (original from Baking From My Home to Yours and adapted by Dorie here on Serious Eats)

makes 16 brownies

INGREDIENTS

1/2 cup all purpose flour

1/8 tsp salt

1/8 tsp cinnamon (optional)

1/3 cup raisins, dark or golden

1 1/2 tbsp water

1 1/2 tbsp dark rum (I replaced this with 1 tsp vanilla)

6 oz bittersweet chocolate, finely chopped

1 1/2 sticks (12 tbsp / 6 oz) unsalted butter, at room temp and cut into 12 pieces

3 large eggs, at room temp.

1 cup sugar

METHOD

  1. Center a rack in the oven and preheat the oven to 300°F. Line an 8-inch square baking pan with foil, butter the foil, place the pan on a baking sheet, and set aside.
  2. Whisk together the flour, salt and cinnamon, if you’re using it.Put the raisins in a small saucepan with the water, bring to a boil over medium heat and cook until the water almost evaporates. Add the rum, let it warm for about 30 seconds, turn off the heat, stand back and ignite the rum. Allow the flames to die down, and set the raisins aside until needed. (I obviously didn’t do this last part as I used vanilla—just added it straight to the raisins.)
  3. Put the chocolate in a heatproof bowl and set the bowl over a saucepan of simmering water. Slowly and gently melt the chocolate, stirring occasionally. Remove the bowl from the saucepan and add the butter, stirring so that it melts. It’s important that the chocolate and butter not get very hot. However, if the butter is not melting, you can put the bowl back over the still-hot water for a minute. If you’ve got a couple of little bits of unmelted butter, leave them—it’s better to have a few bits than to overheat the whole. Set the chocolate aside for the moment.
  4. Working with a stand mixer with the whisk attachment, or with a hand mixer in a large bowl, beat the eggs and sugar until they are thick and pale, about 2 minutes. Lower the mixer speed and pour in the chocolate-butter, mixing only until it is incorporated—you’ll have a thick, creamy batter. Add the dry ingredients and mix at low speed for about 30 seconds—the dry ingredients won’t be completely incorporated and that’s fine. Finish folding in the dry ingredients by hand with a rubber spatula, then fold in the raisins along with any liquid remaining in the pan.
  5. Scrape the batter into the pan and bake 50 to 60 minutes, or until the top is dry and crackled and a knife inserted into the center of the cake comes out clean. Transfer the pan to a rack and allow the brownies to cool to warm or room temperature.Carefully lift the brownies out of the pan, using the foil edges as handles, and transfer to a cutting board. With a long-bladed knife, cut the brownies into 16 squares, each roughly 2 inches on a side, taking care not to cut through the foil.

*Serving: The brownies are good just warm or at room temperature; they’re even fine cold. I like these with a little something on top or alongside—good go-alongs are whipped crème fraiche or whipped cream, ice cream or chocolate sauce or even all three!

*Storing: Wrapped well, these can be kept at room temperature for up to 3 days or frozen for up to 2 months.