Tag Archives: banana

Kale Banana Milkshake

My eye doctor recently told me kale is the new superfood. It’s good for my eyes and I’m thinking it’s good for basically everything else–my hair, my skin, weight control, etc. I recently developed this arm/hand thing (not carpal, ulnal–the nerve that runs through the ring and pinky finger) which I am hoping will improve also.

I’ve been eating kale in salad, in omelets, in quesadillas and as of this morning in my morning smoothie. So that may seem a bit odd, but it’s actually pretty good. And it makes me feel like I started my day off right–and that I’m loving and caring for this not-getting-any-younger physical vehicle of mine.

The kale flavor and bits lend a fresh, green taste and isn’t bitter at all. Besides that, you know that anything with banana and milk is going to be tasty. I tossed in some frozen cantaloupe I had as well, but it’s totally optional and also easily substituted with other fruits.

Enjoy! (Oh and if you know of any interesting kale recipes, pass them my way 🙂 )


Kale Banana Milkshake (inspired by For the Love of Food)

INGREDIENTS

1/2 cup milk

1/2 cup water

1 big leaf kale, without stem and rinsed well

1 banana

1/4 cup cantaloupe, cubed (You can leave this out or replace it with any other kind of fruit.)

1 tbsp honey

METHOD

  1. Put everything into the blender and mix until smooth.

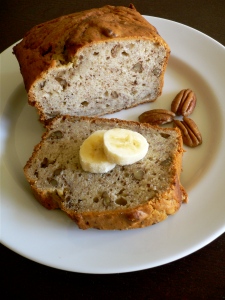
Mmmm…Banana Bread

Nom nom nom. I made this ‘nana bread yesterday with a good friend of mine. We used to teach together, and just recently she became a mommy to the most gorgeous little boy. (He’s so funny; I’ve never met a baby so concerned about being clean!) So now whenever I go over to her place, she schools me on things like feeding schedules, bath time and “Mobys” (a cotton wrap baby carrier—Question: how do people not get tangled up in those things? They look so complicated!)

Anyway, S. had three really, really brown bananas and had asked me what to do with them. Naturally, I suggested banana bread—it’s easy, requires no special equipment or ingredients. I also have a stellar recipe, which I already wrote about in a previous post. I especially appreciate how flexible it is: you choose the kind of “fat”, the liquid, and whether to add nuts or not (No nuts this time). Then, blend wet ingredients and mix dry, combine and bake. How nice.

So, I went over there yesterday afternoon to show S. how to make it. And as we waited for it to bake, we sipped our chai, nibbled on brie and crackers and talked about all the big things happening in our lives right now—there’s A LOT going on. I think it did both our little hearts good—the baking and the talking. Ah, girlfriends. Sniff, sniff. 😛

Enjoy!

Recipe: Banana Bread

LĂșcuma Cream Tart

Today is the last day of my Spanish “class” (not sure whether 2 students qualifies as a class). I stumbled upon this free class by chance and it’s turned out to be one of the best things I’ve done all year. It’s close to work, it’s fun and is the motivation I need to improve my Spanish speaking skills.

Anyway, in celebration of our final class, I decided to bake a tart and also to introduce my teacher and classmate to my beloved lĂșcuma.

The recipe is one I found on Radishes and Rhubarb—straightforward, nothing complicated about it. I tweaked it slightly for my lĂșcuma version (the original is for banana cream pie).

I used my springform thinking I would get a prettier and easier- to-serve tart. However, removing the crust from the sides of the pan turned out to be not so easy. As you can see in the photos, I ended up with an uneven and crumbly crust—not nearly as pretty as I was hoping for. The taste, thank goodness, is exactly what I hoped and totally makes up for any imperfections in appearance.

The  custard is all about la lĂșcuma: dreamy creamy thick, sweet and caramelly. I could have strained the mixture, but chose not to—I really enjoy the starchy texture of lĂșcuma and wanted it to stand out. As for the chantilly cream (which is just whipped cream sweetened with sugar and vanilla), it’s smooth and light and is a good contrast in texture to the custard.


In case you are wondering WHERE outside of the Andes you can find lĂșcuma: here in San Francisco, I know of only one place. It’s a little market on Mission, between 20th and 21st, which sells the fruit in frozen puree form and costs about $5.00 for 16 oz. Other small markets nearby have frozen passion fruit, guava and guanabana, but no lĂșcuma. Maybe next time I’ll try a version with passion fruit.

Enjoy!

LĂșcuma Cream Tart (adapted from here via Radishes and Rhubarb)

Crust

1 1/2 cups crushed graham crackers

1/4 cup sugar

1/3 cup butter, melted

Custard

3/4 cup sugar

1/4 cup cornstarch

2 cups whole milk (I’m sure low-fat would work too)

1 cup lĂșcuma puree

4 egg yolks

1 tablespoon butter

1 teaspoon vanilla

2 bananas sliced

Chantilly Cream

1/2 cup whipping cream

2 tablespoons sugar

1 teaspoon vanilla

METHOD

For the crust:

  1. In a small bowl, stir together the melted butter, sugar and graham cracker crumbs until the crumbs are moistened and the mixture begins to clump together.  Pour the mixture into the bottom of your pie plate and, using your hand, press the crumb mixture to evenly coat the bottom of the pan and up the sides. Set aside.

For the custard:

  1. In a medium saucepan, combine sugar and cornstarch.  Stir in the milk. Cook over medium high heat, stirring constantly until the mixture is thickened and bubbly. Reduce heat to medium low and cook and stir 2 minutes more. Remove from heat.
  2. In a small bowl, lightly beat your egg yolks and then stir in the lĂșcuma puree.
  3. Whisking constantly, slowly add 1 cup of your warm milk mixture to the yolk and lĂșcuma mix.  This will temper the yolks to bring them slowly up to the temperature of the milk so that you do not create scrambled eggs. Pour into the remaining milk mixture in your saucepan. Cook and stir over medium low heat for two minutes more to thicken the custard.
  4. Remove from heat and stir in the vanilla extract and tablespoon of butter. If desired, you can strain the custard through a fine sieve to ensure it is smooth and there is no cooked egg in the mixture.

Assembly:

  1. Cover the bottom of your prepared crust with the banana slices and pour the custard over top.  Smooth the top with a spatula and cover with plastic wrap.  Place in the fridge for 6-8 hours to allow the custard to set and the tart to cool completely. You can prepare the tart the night before if you wish.

For the Chantilly Cream:

  1. In a stand mixer or with a handmixer on high speed, beat the cream until soft peaks form.  Add the sugar and vanilla and beat about 1 minute more until firm peaks form.  Right before serving the tart, spread the top with the whipped cream and garnish with banana slices.

Applesauce Bread

It seems like all I ever bake is quickbread and poundcake. I would much rather be baking tarts filled with pastry cream and berries or flourless chocolate tortes, but they’re actually not very popular at work.  I’m starting to think that people like and even prefer simple. I mean, there’s a reason why there are nearly one thousand entries on Tastespotting for brownies and 500 for chocolate chip cookies alone. They’re classic, homey and, for many people, have sentimental meaning associated with them.

This recipe from Applesauce Bread is exactly that: warm, homey and filled with nostalgia. I didn’t grow up eating this and don’t have a heartwarming antidote to tell. But if I did, I would want it to be about this bread.

I tweaked the original recipe from Back to the Cutting Board ever so slightly by adding a few tablespoons of ground flaxseed, a banana and a handful of raisins. In hindsight, I wish I would’ve left the banana out, as it’s aroma takes away from that of the applesauce. The raisins, however, were definitely a wise addition. They plump up during baking and are a pleasant little burst of flavor in each bite.

The cake comes out pretty dense and moist—as the best kind do. This is probably due to the addition of the banana and raisins.

Enjoy 😛

Applesauce Bread (original recipe adapted from Back to the Cutting Board)

INGREDIENTS

1/2 cup (1 stick) butter or margarine, at room temp.

1 cup sugar

2 eggs

1 3/4 cups flour

1 tsp salt

1 tsp baking powder

1/2 tsp baking soda

1/2 tsp cinnamon

1/2 tsp nutmeg

2 tbsp ground flaxseed

1 cup unsweetened applesauce

1 ripe banana

1/2 cup raisins

METHOD

  1. Preheat oven to 350 F.  Grease a standard 9×6×3-inch loaf pan.
  2. In a large bowl gradually add sugar into butter, cream until light.  Add eggs and beat until light and fluffy.
  3. In a separate bowl combine all the dry ingredients, except the banana and raisins.
  4. Combine half the dry mixture with the butter mixture.  Then add in 1/2  cup of applesauce and combine.  Repeat with remaining dry mixture and 1/2 cup of applesauce, mixing after each.
  5. With a spatula or wooden spoon, stir in the sliced banana and raisins.
  6. Pour batter into pan.  Bake for about 1 hour.  It’ll be a nice golden brown and a toothpick will come out clean.  Cool 10 minutes and remove from pan. Let cool to room temperature before serving.

Twice-Baked Vanilla-Orange Granola with Bananas and Raisins

Granola is great.

Especially this one, which is packed with bananas, almonds and raisins and infused with vanilla, orange and cinnamon. I wasn’t planning on baking twice, but am really glad I did. The clusters came out super crunchy and also have a really nice roasted flavor.

This batch is for Liam. Hope he likes it!

Enjoy!

Twice-Baked Vanilla-Orange Granola with Bananas and Raisins (adapted from a recipe found on Answer Fitness)

INGREDIENTS

3 cups rolled oats

1/3 cup ground flaxseed

1/2 cup chopped nuts, such as walnuts, pecans or almond flakes (I used almonds.)

1/4 cup sunflower seeds

1/3 cup brown sugar, packed

1 tbsp vegetable oil

1/2 tsp orange peel

1/3 cup freshly squeezed orange juice

1/2 tsp vanilla extract

1 tsp cinnamon

2 ripe bananas, sliced into rounds

3/4 cup raisins

METHOD

  1. Preheat oven to 325 degrees.
  2. Combine orange juice, oil, brown sugar, cinnamon, vanilla extract and orange peel in a small saucepan and heat over medium-high heat, stirring occasionally, until the sugar has dissolved. Set aside.
  3. In a large mixing bowl, combine rolled oats, flaxseed meal, and chopped nuts. Stir.
  4. Mix in the sliced banana rounds and raisins.
  5. Pour the orange juice mixture over the oat mixture and mix gently until the oats are thoroughly coated.
  6. Spread the oats in a thin layer on a baking sheet. Then, use your fingers to form large clusters with about half (or more) of the mixture.  Place the baking sheet in the oven and bake for 30 minutes, stirring the granola once during the baking cycle (at around the 15 minute mark).
  7. Remove from oven and let sit out overnight.
  8. The next day, preheat the oven again to 325 F. Again spread the granola evenly on a baking sheet and place it in the oven. Bake for 15-20 minutes, stirring once during the baking cycle (at around the 10 minute mark).
  9. Remove from the oven and let cool overnight. The granola will have shrunk a bit and will be a rich, golden brown.
  10. For best results (and a nice crunchy granola) store the cooled granola in an airtight container or freezer bag in the icebox.

The Fruit Salad that Saved Dinner. And a Friendship.

I had this long weekend all planned out. Dinner with friends on Friday, hiking and studying my Spanish on Saturday. And for Valentine’s Day, one of those independent girlie in the city dinners.

But today is Valentine’s Day. And where am I? Sitting alone in a cafe, wondering how I ended up here. And by here I mean not at my V-day dinner and in particular, not with Dennis. (Btw, does anyone else get weirded out by the abbreviation “V-day”? Am I the only one who, instead of thinking of love, thinks of The Vagina Monologues? Maybe it’s just me. But all day I’ve been getting texts from people wishing me a happy V-day…and it weirds me out every time.)

ANYWAY, as it turns out, my “alone in the city” girl Valentine’s dinner was actually YESTERDAY. I was sitting at home last night about to prepare a quick bite before getting ready for some masquerade party over at Pier 39 (total bust, btw). And then comes the text from my friend asking when I’m coming over for dinner…shiiiiiit. Somehow I was able to throw all my stuff together and cab it over to her place in under 30 minutes—mumbling and grumbling the whole way over. (All that stress—I swear I can feel it shortening my life. It’s so unhealthy!)

All my cooking plans were ruined. I was going to make Peruvian-style Arroz con Pollo, Papa a la Huancaina (both Dennis’ mom’s recipes) and an Ecuadorian fruit salad I read about on Laylita’s Recipes. The only thing I managed to put together was the dessert—and thank goodness for that. I already felt like the biggest bonehead ever for nearly missing the dinner I co-planned. So I was glad to be able to contribute at least something. Really, it saved the day. And possibly a friendship.

Now my only problem is all the other groceries I’m now stuck with because of my bonehead mistake.

Anyway, this fruit salad is awesome. Easy to put together, healthy, sweet. I especially love the flavor of all the juices combined. It also looks great served in drinking glasses.

Enjoy!

Come y Bebe or Ecuadorian Drinkable Fruit Salad (from Laylita’s Recipes)

INGREDIENTS

4 1/2 cups fresh squeezed orange juice (ca. 10 oranges)

1 large papaya, peeled, seeded and diced

1 pineapple, peeled, cored and diced

6 bananas, peeled and sliced

sugar or honey to taste (I used brown.)

honey whipped cream to serve (optional)

METHOD

  1. Combine the diced papaya, pineapple and banana in a large, non-reactive bowl.
  2. Mix in the freshly squeezed orange juice, add sugar or honey if needed.
  3. Serve immediately or chill for 30 minutes if you prefer it very cold.

Can’t Sleep Banana Almond Cake

It’s late, and I’m exhausted—got some disappointing news at work, was distracted at yoga and am just a little sad that the person I want most by my side is not. Seems like a day to sleep off and forget about.

I wish.

Tonight is not that night. I can’t sleep. And the only thing I can think to do instead is bake.

So that’s just what I’ve done.

Three ugly, black bananas have been sitting in the fridge for God knows how long. They’re not mine, but somehow I don’t think either L. or M. will mind. Rescued from near death and brought back to life in the form of a banana almond cake. I could’ve made banana bread—predictable. boring. I thought about banana upside down cake—But slicing? Right now? No. So this slightly more creative than quickbread and slightly less fussy than upside down cake recipe fit the bill for my sleepless night.

The original recipe (from Zomtbakes) called for topping the cake with a honey-mascarpone-pistachio frosting. This sounds great, but who ever “just happens to have” a tub of mascarpone in their fridge? Not me. Also, if I were to put on my food purist hat, I would say that the frosting—as is often the case—is unnecessary as it would corrupt the natural aroma of the bananas. Then again, who doesn’t love frosting (not gross Safeway frosting but smooth, creamy, ever so mildly tart mascarpone frosting)?

In the end, I just needed something to fill the hours of this sleepless night. This was good. Try it.

(Posting pics tomorrow morning. I’m sleepy! Yay!)


Banana Almond Cake (adapted from Zomtbakes)

INGREDIENTS

2 tbsp butter, at room temp., plus a little extra for greasing

160 g (3/4 cup) soft brown sugar

1 egg, at room temp.

1 tsp almond extract

3 very ripe bananas, mashed

1 cup whole wheat flour

1/2 cup almond meal

3 tsp baking powder

1/4 cup flaked almonds, plus a little extra for topping.

METHOD

  1. Beat together the butter and brown sugar until smooth and creamy. Add the egg and almond extract and continue to beat until smooth. Then beat through the mashed up banana; don’t worry if there are some banana chunks in there.
  2. Combine the whole wheat flour, ground almonds & baking powder. With a spatula, fold the flour mixture into the banana mixture until smooth. Then fold through the milk until all smooth.
  3. Spoon the batter into a greased springform, tapping the side with a wooden spoon, in order to get a smooth surface. Sprinkle a small handful of flaked almonds over the top.
  4. Bake at 170 C (ca. 340) for around 40-45 minutes. Check it at the 30 minute mark as you don’t want to over cook this. The top should be nice and golden. (I had to bake mine for an additional 10 minutes before the cake was finally cooked all the way through.)

Banana Bread

I recently made the biggest leap of my life–giving up job, friends and Asia–for love. Traumatic, sad and teary-eyed, I boarded a plane for San Francisco and haven’t looked back since. But, that isn’t the point of this post.

The point is what happened after–how my life has transformed; how I have grown and learned all over again what real love is. I thought life was going to stop, but it didn’t. Despite everything, life has continued and so have I. Here in San Francisco, I have been able to build a new life for myself. I’m working again, I have a good, safe home with kind roommates, and I am completely and utterly surrounded by love. It’s as if I were meant to come here. From the moment I arrived, I have been cradled and taken care of. And somehow, I have been able to heal.

This banana bread recipe comes from my adopted mom and sister here in the Bay area. Like any good banana bread, it is moist, spongey and–best of all–is completely adaptable. So for people like me who can’t help but want to mix in as many dried fruit-nut-chocolate combinations, this recipe is ideal.

P1060709

Mrs. Zuehlke’s Banana Bread (recipe from Martha)

INGREDIENTS

2 C flour

1 tsp. baking powder

1/2 C sugar

1/2 C butter

1 C mashed ripe banana (= 2 long or 3 short)

1 C nuts or candied nuts if desired

1/2 C buttermilk (yogurt, sour cream and milk work too)

1 tsp. baking soda

2 eggs

1 tsp. vanilla or extract of your choosing

1 tsp. salt

INSTRUCTIONS

  1. Combine wet ingredients and whirl in blender.
  2. Combine dry ingredients in a separate bowl. (If you want to add any nuts, dried fruit and/or grated chocolate, do so now.)
  3. Pour the whirled wet ingredients over the dry ingredients and mix for as little time as possible.
  4. Pour batter into a greased pan and bake in a 350F oven for 45 – 60 minutes until a knife inserted into the center comes out clean.  (One may need more minutes for a smaller, deeper pan than for a larger, shallower one.)
  5. Frost if desired.

Lemony Blueberry Banana Muffins

I am moving to San Francisco! Left Singapore this last Tuesday and am visiting with the parents for a week before driving down to the foodie mecca that is SF!

It’s only been 4 days, but I find myself gritting my teeth and wanting to pull my hair out sometimes what with all the constant ‘catch up’ chatting I’ve been doing. Don’t get me wrong–I missed them terribly while I was a world away in Asia. (Singapore is just too far away.)–I am just so ready to start my new life in SF and couldn’t be more excited about all the adventures that are coming my way!

Anyhow, to fill my time, I decided to do a little baking. Mind you, I have none of my supplies, no scale,  don’t have the kind of ingredients I’m used to having…and it’s not my kitchen! After a quick inventory and raid of my mom’s pantry, freezer and fridge, I came up with the idea of making  citrusy blueberry banana muffins of sorts. Not surprisingly, there are tons of recipes for just such a craving.

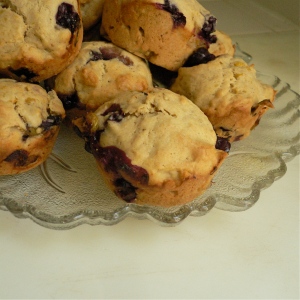
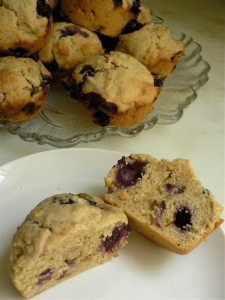
The recipe I chose to test out this time is from Dragon’s Kitchen. I followed the recipe (to the best of my ability anyway), though left out the sugar-lemon zest topping, and produced these:
P1060519

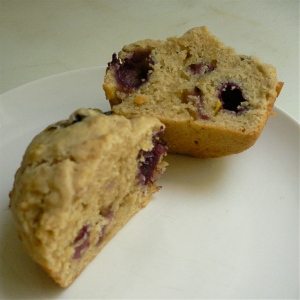
Upon first glance, they look more cake-y/quickbread than muffin. And upon first taste, that is what they turned out to be! Alas, this is what happens when I bake without my almighty scale!

Here are the issues I encountered:

  1. My mom only had jumbo eggs. Though I know that a large egg weighs roughly 60+g, without my scale, I had to guess (gasp!!)
  2. I had to use a measuring cup to measure out the flour, which I think led to my adding too much flour. And to think–I used to SCORN metric-based recipes. It was not until I really started getting into baking that I realized how scientific baking really is and how helpful a scale is in maintaining exactness.
  3. I only had 1 banana.

In any case, the resulting batter was a bit thick. Though I tried to remedy this by adding a little banana yogurt, I’m not sure it did any good in the end.

All in all, I’d say it’s unfair of me to judge this recipe based on my results. The muffins themselves are tasty—mildly sweet and moist—however, they’re a bit too dense for me and texture-wise feel more like a quickbread than muffins.

Oh, well. Once I settle in my new home and get my kitchen back in order, I definitely plan on trying the recipe again. If you decide to try it, do let me know how it goes for you!

Lemony Blueberry Banana Muffins (adapted from Dragon’s Kitchen)

INGREDIENTS
2 1/4 cup flour
2 teaspoons baking powder
1/2 teaspoon salt
1/2 teaspoon ground cinnamon
2 large ripe bananas, mashed
2 eggs
2/3 cup brown sugar, firmly packed
1/2 cup butter, melted
1 tablespoon vanilla
1 tablespoon lemon juice
1 cup blueberries
2 tablespoons grated lemon rind
3 tablespoons sugar

INSTRUCTIONS

  1. Preheat oven to 375 F. Lightly grease muffin tin.
  2. Combine flour, baking powder, salt, cinnamon and 1 tablespoon of the lemon rind.
  3. Beat together bananas, eggs, brown sugar, butter, lemon juice and vanilla until blended.
  4. Stir in dry ingredients until blended. Stir in blueberries just until combined. Spoon into prepared muffin cups, dividing batter equally.
  5. For the topping, combine sugar and remaining lemon rind in small dish. Sprinkle evenly over the muffins.
  6. Bake for 25-30 minutes or until golden.
P1060520

P1060523

Chocolate Banana Nut Cake

IMG_4676

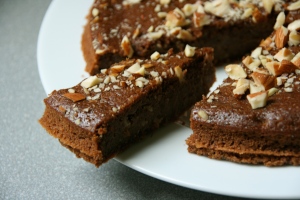
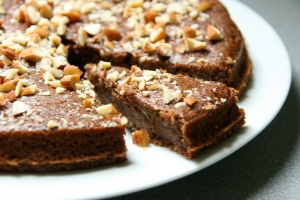
This cake is really easy to put together. I ended up halving the recipe and keeping the original bake time, which in the end worked out very well. This might have to do with the fact that I used an 8 inch cake pan rather than a 10 inch as the recipe called for. Actually, I would recommend making only half if you are just making it for your family.

The cake is dense, banana-rich and spongey. I also only had ground almonds and whole almonds on hand, so that is what I used in place of the hazelnuts or walnuts.

(I made this cake a few months back and for the life of me, can’t remember where I got the recipe from!!! I did a googlesearch but was unable to find any one similar to this one. I have feeling, however, that I adapted it from a “Hauscake” recipe out of TipTopf, a Swiss cookbook.)

Chocolate Banana Nut Cake

Ingredients

6 oz unsalted butter, diced

6 oz bittersweet chocolate (I used good-quality dark 70%)

1 1/2 cups plain flour

190 g fine sugar

1/2 cup ground walnuts (I used almonds)

2 tsp baking powder

1/2 tsp baking soda

1/4 tsp salt

2/3 cup buttermilk

1 tbsp vanilla extract

2 cups (450 g) very ripe bananas, lightly mashed

3 eggs, lightly beaten

1/4 cup chopped walnuts, hazelnuts or pecans (I used almonds)

Directions

1. Preheat oven to 180°C. Greased and lined a 10 inch cake pan. Melt butter and chocolate in a double boiler till it is smooth. Set aside to cool slightly.

2. Sift together flour and baking powder and baking soda. Add sugar, ground hazelnuts, and salt. Blend thoroughly.

3. Stir in buttermilk, vanilla extract and banana just until combined. Set aside.

4. Add the eggs to the cooled chocolate mixture. Stir until well combined and thick. Stir into the banana mixture until well combined.

5. Pour batter into pan and bake for 20 mins. Remove and sprinkle chopped pecan nuts over the top and continue to bake for another 25 to 30 mins until skewer comes out clean.

6. Cool cake on rack. Serve either plain or a dollop of whipped cream.

IMG_4668